• Skip to primary navigation
  • Skip to main content
  • Skip to primary sidebar

  • RECIPES
  • CAKES
  • MUFFINS
  • COOKIES
  • ABOUT
  • en
    • es
    • en
menu icon
go to homepage
  • RECIPES
  • CAKES
  • MUFFINS
  • COOKIES
  • ABOUT
    • Pinterest
    • YouTube
  • search icon
    Homepage link
    • RECIPES
    • CAKES
    • MUFFINS
    • COOKIES
    • ABOUT
    • Pinterest
    • YouTube
  • ×

    Mar 23, 2022 · Modified: Jun 6, 2023 by Camila Benitez · This post may contain affiliate links ·

    Telera Roll: Traditional Mexican Bread

    Jump to Recipe Jump to Video Pin Recipe Print Recipe

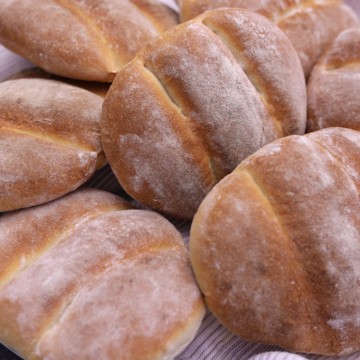
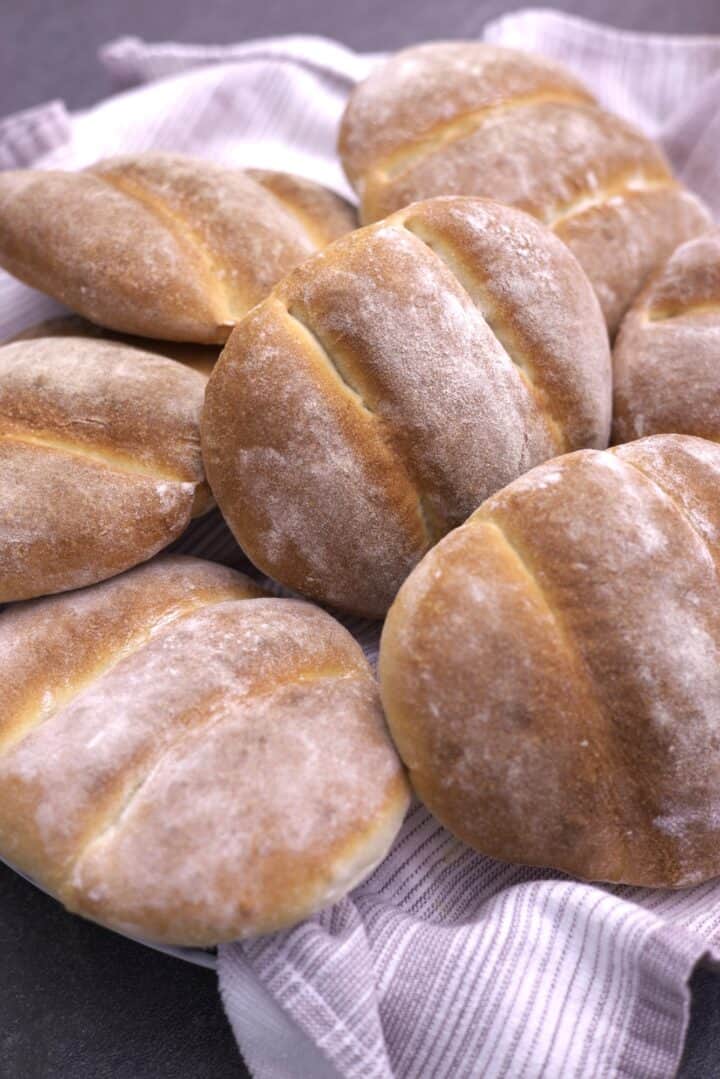
    Telera Roll, also known as Telera Bread, is a traditional Mexican bread with a flour-dusted crust and two long scores that distinguish it from other types of bread. Its satisfying density allows it to hold up to generously portioned fillings without falling apart. In addition, the mild flavor will allow it to be used in various preparations, as it can complement a wide range of proteins, cheeses, cured meats, and other ingredients.

    Jump to:
    • What is Telera Roll?
    • Telera Roll Ingredients
    • Tools you’ll need 
    • How to Make Telera Roll
    • Substitutions
    • Variations
    • How to Serve
    • Additional Suggestions on How to use Telera Bread:
    • How to Store & Re-Heat
    • Make-Ahead
    • How to Freeze
    • Tips for Making The Best Telera Roll
    • FAQ
    • Related Recipes:
    • Watch How to Make Telera Roll
    • 📖 Recipe

    What is Telera Roll?

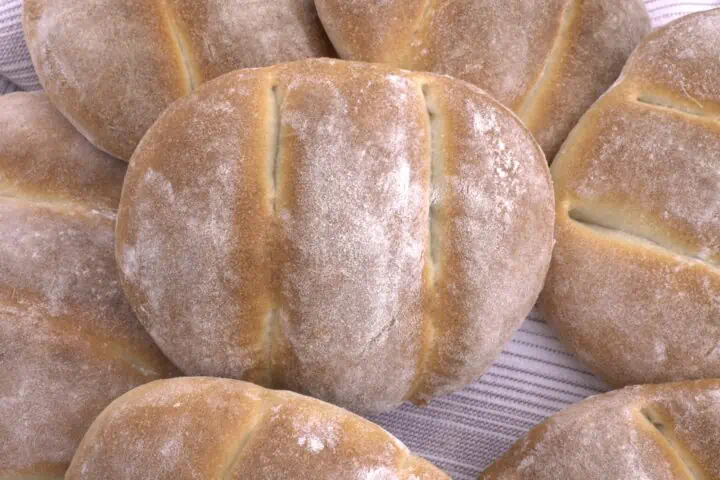
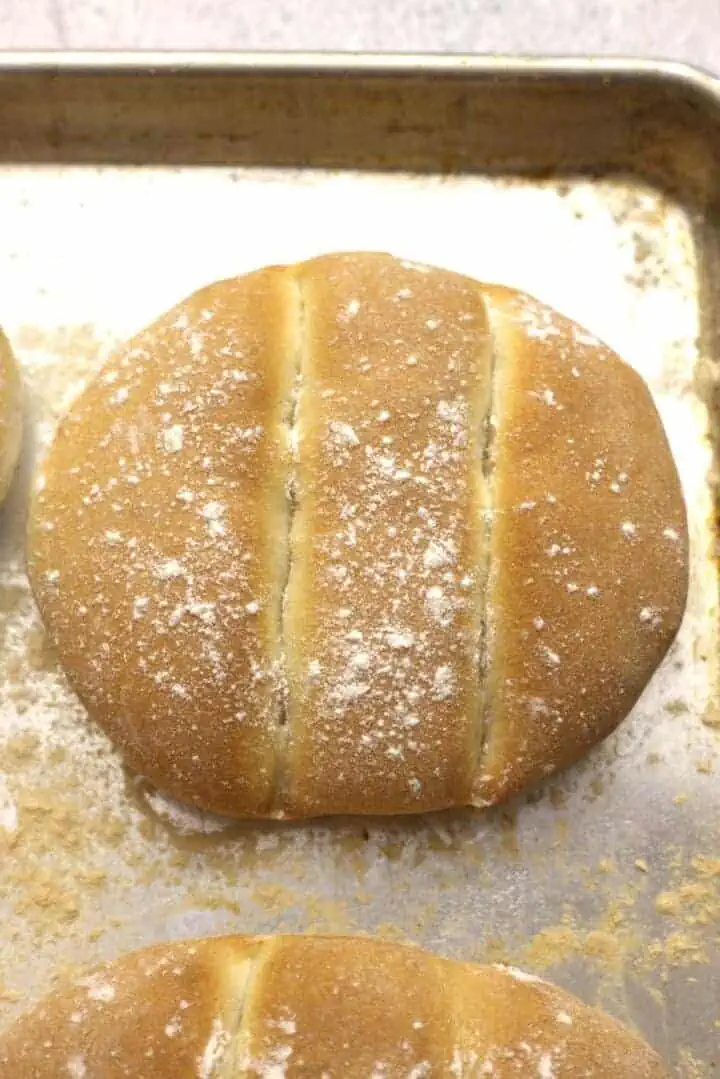
    Telera is a flat, soft roll with a slightly oblong or rounded shape and a flour-dusted crust. It is widely consumed throughout Latin America and is considered a staple. Its signature is two shallow indentations on the top to divide it into three sections. Telera is the bread of choice for tortas, the traditional Mexican sandwiches.

    The Best Telera Roll

    Telera Roll Ingredients

    Note: The full ingredients are provided in the recipe card below.

    • Flour: I strongly recommend using bread flour in this recipe, even though you can use all-purpose flour. Using bread flour results in lighter and fluffier bread.
    • Water: To avoid killing the yeast, keep the water temperature between 110°F and 115°F.
    • Dry Instant yeast: I use Instant yeast in this recipe. 
    • Kosher salt: It helps tighten the gluten strands that have formed, making the bread stronger. In addition, it enhances the flavor.
    • Granulated sugar: Adding sugar to bread helps the yeast produce carbon dioxide faster, allowing for quicker rising times. Sugar also enhances flavor, tenderizes the crumb, increases browning, and retains moisture, extending the bread’s shelf life.
    • Shortening: Adding shortening to bread results in a higher rise, a crisper crust, and a longer shelf life.

    Tools you’ll need 

    • 30 qt. standard weight mixing bowl
    • Plastic Dough Scraper
    • Mitten Oven
    • Liquid Measuring Cups
    • Dry Measuring Cups and Spoons
    • kitchen thermometer
    • Small Fondant rolling pin ( about 1-inch diameter)

    How to Make Telera Roll

    Note: The full instructions are provided in the recipe card below.

    Pre-Ferment the yeast: In a medium bowl, add 1 cup of flour, yeast, and 1 cup of slightly warm water, about 110° F and 115° F; use a kitchen thermometer for accuracy. Using a rubber spatula, mix to combine. Let the yeast mixture sit for about 15 minutes until it doubles in size.

    Teleras Rolls
    Best Telera Rolls

    Best Telera Rolls
    Best Telera Rolls

    Make the dough & let it Rest: Combine the remaining flour, sugar, and salt in the center of a clean work surface or a 30 qt. standard-weight mixing bowl. Make a well in the center of the flour mixture about 4 inches wide. Add the yeast mixture and the shortening into the well; use your hand to incorporate the dry mixture into the wet mixture a little at a time until somewhat incorporated.

    Next, pour in the warm water while using your hand to combine the ingredients into a homogeneous mixture. Knead the dough until you have a smooth and elastic dough that releases from the work surface or the bowl, about 10 to 15 minutes. If you find your dough sticking to your work surface after kneading it, you can try drizzling a bit of oil rather than flour to help it release itself from the surface. The oil will create a barrier between the dough and the surface, making it easier to work with.

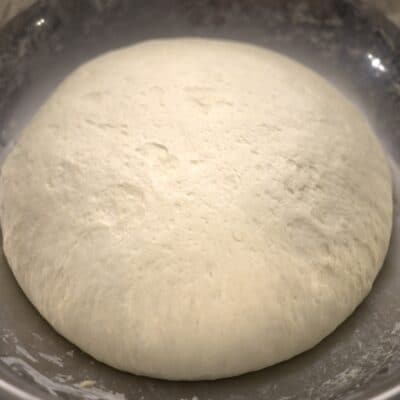
    Just be sure to use a light hand when adding the oil, as too much can make the dough greasy and difficult to work with. When the bread dough has been kneaded to the perfect consistency, cover it with a clean kitchen towel and rest for at least 30 minutes or until it’s nearly doubled in bulk.

    Best Telera Rolls
    Best Telera Rolls

    Best Telera Rolls
    Best Telera Rolls

    Divide the dough & Shape it:

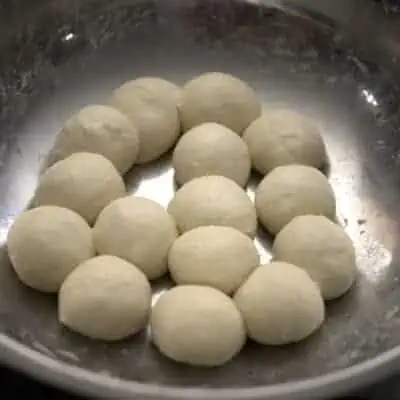
    Once the dough has rested, gently punch it down, deflating the dough. Divide bread dough into 110g equal pieces. Use a kitchen scale for accuracy. Roll each piece into a ball, cover it with a towel, and let it rest for 5 minutes. Take one of the dough balls and coat both sides with a generous amount of flour. Be sure to evenly distribute the flour as you work to prevent the dough from sticking to the surface or rolling pin.

    Then, place the dough ball onto a clean surface. Use a small fondant rolling pin ( about 1-inch diameter) or your hand to stretch out the dough towards the ends just a bit; this should form a slightly oval shape about 5 to 6 inches long, depending on how large you want them to be. Repeat this process with the remaining dough balls, coating each with flour before shaping.

    Best Telera Rolls
    Best Telera Rolls

    Make the Indentations & Let it Rest:

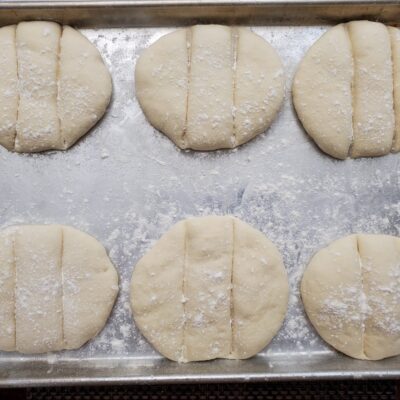
    Using the fondant rolling pin or a wooden spoon handle, press two deep marks on the long part of the dough, all the way to the bottom without cutting through, visually dividing it into three long sections. Repeat this process twice to achieve the Telera rolls shape with three divisions. 

    Telera Roll

    Bake & Cool:

    Once the dough has been shaped, place it onto a baking sheet pan that has been dusted with flour or lined with parchment paper, cover it with a towel, and let rise until almost doubled in size, about 25 to 30 minutes. Fifteen minutes before baking your bread dough, preheat your oven to 400 °F, and bake the telera rolls for 20 minutes or until the internal temperature of the bread reaches 190 °F. When the Telera is done, remove them from the baking sheet to cool on a wire rack.
    Substitutions

    • Flour: Instead of using bread flour, you can use all-purpose flour.
    • Shortening: If you prefer not to use shortening, you can substitute it with an equal amount of softened butter or vegetable oil.
    • Sugar: You can replace granulated sugar with honey, maple syrup, or other sweetener. Adjust the quantity according to your preferred sweetness level.
    • Salt: If Himalayan or kosher salt is unavailable, you can use regular table salt as a substitute. Just adjust the quantity to taste, as table salt is typically finer and saltier than Himalayan or kosher salt.
    • Instant Dry Yeast: If you don’t have instant dry yeast, use active dry yeast instead. However, remember that active dry yeast may require proofing in warm water before using it in the recipe. Follow the instructions on the yeast package for proofing and adjust the amount accordingly.

    Check out this Bolillo Bread on my website!

    Variations

    • Herb and Cheese Telera Rolls: Add chopped fresh herbs like rosemary, thyme, or parsley to the dough during the kneading process. You can also incorporate grated cheese such as cheddar, Parmesan, or mozzarella into the dough for added flavor.
    • Garlic Telera Rolls: Mix minced garlic or garlic powder into the dough to give the rolls a savory garlic taste. You can also brush the baked rolls with melted butter infused with garlic for an extra garlic kick.
    • Whole Grain Telera Rolls: Substitute a portion of the bread flour or all-purpose flour with whole wheat flour or other whole grain flour like rye flour or spelt flour. This will add a nutty flavor and increase the nutritional value of the rolls.
    • Sweet Telera Rolls: Increase the sugar in the dough to make slightly sweet rolls. You can also add ingredients like raisins, dried cranberries, or cinnamon for a sweet and spiced variation. After baking, you can brush the rolls with a simple syrup glaze for extra sweetness and shine.
    • Savory Telera Rolls: Incorporate savory ingredients into the dough, such as chopped olives, sun-dried tomatoes, or cooked bacon bits. These additions will provide a delicious and savory twist to the rolls.

    How to Serve

    Telera rolls are perfect for making delicious sandwiches or sliders. Slice them horizontally and fill them with your favorite deli meats, cheeses, and veggies for a satisfying sandwich. You can also use them as a slider base, adding mini-sized burger patties or pulled meats with your preferred condiments. Telera rolls are also great for making bruschetta or crostini by toasting them in the oven until crispy and topping them with fresh tomatoes, basil, and olive oil.

    They can also be served as a side with soups, stews, or chili, providing a soft and fluffy bread to accompany your meal. Whether used for sandwiches, appetizers, or alongside hearty dishes, Telera rolls are sure to add a delicious touch to any meal.

    Additional Suggestions on How to use Telera Bread:

    The following types of sandwiches are perfect for Telera:

    • Sandwich de Lomito Completo (Paraguayan Style Steak Sandwich)
    • Tenderloin Sandwich
    • Pan con Pollo
    • Pan con Pavo
    • Tenderloin Sandwich with Sweet-Sour honey mustard

    How to Store & Re-Heat

    Once baked, telera rolls can be stored at room temperature for up to 3 days or 5 days in the refrigerator in a plastic storage bag or wrapped in aluminum foil. To reheat, microwave it until heated through or warm it up in a 350 F preheated oven for 10 to 15 minutes; wrap the bread in aluminum foil to keep the crust soft and tender as it warms up.

    Make-Ahead

    Telera dough can be made a day ahead, punch down the dough, cover, and refrigerate the dough overnight after the first rise. Then, shape the dough as directed in the recipe and let it rise a second time until light and doubled in size, 25 to 35 minutes.

    How to Freeze

    Allow the baked telera rolls to cool completely on a wire rack before wrapping them in plastic wrap and placing them in a freezer zip-top freezer bag to keep them fresh. Store them in the freezer for up to 3 months. When you’re ready to eat it, gently reheat it from frozen in a preheated to 350°F for 10 to 15 minutes.

    Telera Roll

    Tips for Making The Best Telera Roll

    • Kneading: When kneading the bread dough, it is essential to put your body weight into it, get on top of the dough to stretch it, and not tear it.
    • Preheat the oven: Remember to preheat it at least 15 minutes before using it.
    • Wait for the bread to cool: When it comes out of the oven, it still has a lot of moisture and carbon dioxide. Therefore, it needs time to cool to have a better texture, flavor, and aroma.
    • For Fluffier Bread: The bread will be fluffier and richer if the shortening is at room temperature.
    • Salt in Bread: Any salt is valid when making bread dough. For example, table salt, kosher salt, sea salt, or grain salt; make sure it can be dissolved in the dough. If you have very coarse grains, grind them and incorporate them.
    • Be careful when adding sugar: Remember not to add more sugar than the recipe calls, as the bread dough may clump together.
    • Knead without getting tired: If kneading is too tiring, try kneading for 30 seconds and let the bread dough rest for 5 minutes. Repeat the process. On the third time, when you go to knead, it will seem that someone has kneaded for you. Remember: rest, kneads.
    • Invest in Measuring spoons and Measuring cups: They are precise tools. Be sure to measure the amounts indicated in the recipe to come out very well.

    Telera Roll

    FAQ

    What Bread is similar to Telera?

    Bolillo Rolls is similar to Telera but has a crusty crust; while Telera’s crust is softer, both types of bread are typically used for sandwiches.

    What is the difference between telera and Bolillo?

    Telera roll is a bolillo roll variation; both are very similar. Telera rolls, on the other hand, are typically flatter and sweeter with a softer crust than bolillo rolls, which are oval and less sweet with a more crusty crust. Telera rolls are also slightly oblong or even rounded, making them larger than the oval-shaped bolillo. Telera also has a flour-dusted crust with two shallow indentations on top that divide it into three sections.

    What are Telera Rolls used for?

    Telera rolls are often used to make Mexican tortas or sandwiches.

    What is Telera Roll made of?

    Telera rolls are made from wheat flour, yeast, water, salt, and optional ingredients, lard or shortening.

    What does Telera roll taste like?

    Telera bread has a mild flavor and a touch of sweetness.

    What are Mexican torta rolls called?

    Mexican tortas are typically made with teleras and bolillos rolls.

    How do you know when the Telera roll is ready for shaping?

    When the bread dough has been kneaded to the perfect consistency, cover it with a clean kitchen towel and rest for at least 30 minutes or until it’s nearly doubled in bulk. Once the dough has rested, gently punch it down, deflating the dough. Now, it can be shaped.

    How long do you cook Telera Rolls?

    Bake Telera in a preheated 400 F oven for 20 minutes or until well browned.

    How do you know when the Telera Roll is done?

    A super effective way to know that your bread is ready is to tap it with your knuckles on the bottom and listen for a hollow sound.

    How many calories does telera bread have?

    There are approximately 229 calories in one piece of Telera bread.

    Related Recipes:

    • Rosemary Focaccia bread
    • Breadsticks
    • Galleta Cuartel
    • Galleta Paraguaya
    • Sandwich Bread
    • Whole Wheat Pita Bread 

    Watch How to Make Telera Roll

    📖 Recipe

    HOMEMADE FOOD IS TRUE LOVE MADE EDIBLE

    How to Make Telera Roll

    Camila Benitez
    Telera Roll, also known as Telera Bread, is a traditional Mexican bread with a flour-dusted crust and two long scores that distinguish it from other types of bread. Its satisfying density allows it to hold up to generously portioned fillings without falling apart. In addition, the mild flavor will allow it to be used in various preparations, as it can complement a wide range of proteins, cheeses, cured meats, and other ingredients.
    5 from 54 votes
    Print Recipe Pin Recipe Add to Collection Go to Collections
    Prep Time 1 hour hr 10 minutes mins
    Cook Time 20 minutes mins
    Resting Time 2 hours hrs
    Total Time 3 hours hrs 30 minutes mins
    Course Side Dish
    Cuisine Mexican
    Servings 18 Telera Roll

    Tools

    • 30 qt. standard weight mixing bowl
    • Plastic Dough Scraper
    • Mitten Oven
    • Liquid Measuring Cups
    • Dry measuring cups and spoons
    • kitchen thermometer
    • Small Fondant rolling pin ( about 1-inch diameter)

    Ingredients
      

    For the Dough:

    • 875 g ( about 7 cups) bread flour or all-purpose flour
    • 452 ml ( about 2 cups) warm water (110⁰F and 115°F), as needed
    • 18 g (4 teaspoons) Himalayan or kosher salt
    • 34 g ( about 2-1/2 tablespoons) granulated sugar
    • 40 g (3 tablespoons) shortening such as Crisco softened to room temperature

    For the Pre - Ferment dough:

    • 125 g (1 cup) bread flour or all-purpose flour, spooned and leveled
    • 226 ml ( 1 cup) warm water (110 ⁰F to 115°F)
    • 10 g (about 3 teaspoons) instant dry yeast

    Instructions
     

    Pre-Ferment the yeast:

    • In a medium bowl, add 1 cup of flour, yeast, and 1 cup of slightly warm water, about 110° F and 115° F; use a kitchen thermometer for accuracy. Using a rubber spatula, mix to combine. Let the yeast mixture sit for about 15 minutes until it doubles in size.

    Make the dough & let it Rest:

    • Combine the remaining flour, sugar, and salt in the center of a clean work surface or a 30 qt. standard-weight mixing bowl. Make a well in the center of the flour mixture about 4 inches wide.
    • Add the yeast mixture and the shortening into the well; use your hand to incorporate the dry mixture into the wet mixture a little at a time until somewhat incorporated. Next, pour in the warm water while using your hand to combine the ingredients into a homogeneous mixture.
    • Knead the dough until you have a smooth and elastic dough that releases from the work surface or the bowl, about 10 to 15 minutes. If you find your dough sticking to your work surface after kneading it, you can try drizzling a bit of oil rather than flour to help it release itself from the surface.
    • The oil will create a barrier between the dough and the surface, making it easier to work with. Just be sure to use a light hand when adding the oil, as too much can make the dough greasy and difficult to work with. When the bread dough has been kneaded to the perfect consistency, cover it with a clean kitchen towel and rest for at least 30 minutes or until it's nearly doubled in bulk.

    Divide the dough & Shape it:

    • Once the dough has rested, gently punch it down, deflating the dough. Divide bread dough into 110g equal pieces. Use a kitchen scale for accuracy. Roll each piece into a ball, cover it with a towel, and let it rest for 5 minutes.
    • Take one of the dough balls and coat both sides with a generous amount of flour. Be sure to evenly distribute the flour as you work to prevent the dough from sticking to the surface or rolling pin.
    • Then, place the dough ball onto a clean surface. Use a small fondant rolling pin ( about 1-inch diameter) or your hand to stretch out the dough towards the ends just a bit; this should form a slightly oval shape that is about 5 to 6 inches long, depending on how large you want them to be. Repeat this process with the remaining dough balls, coating each one with flour before shaping.

    Make the Indentations & let it Rest:

    • Using the fondant rolling pin or a wooden spoon handle, press two deep marks on the long part of the dough, all the way to the bottom without cutting through, visually dividing it into three long sections. Repeat this process twice to achieve the Telera rolls shape with three divisions.

    Bake & Cool:

    • Once the dough has been shaped, place it onto a baking sheet pan that has been dusted with flour or lined with parchment paper, cover it with a towel, and let rise until almost doubled in size, about 25 to 30 minutes. Fifteen minutes before baking your bread dough, preheat your oven to 400 °F, and bake the telera rolls for 20 minutes or until the internal temperature of the bread reaches 190 °F. When the Telera is done, remove them from the baking sheet to cool on a wire rack.

    Notes

    How to Serve
    Telera rolls are perfect for making delicious sandwiches or sliders. Slice them horizontally and fill them with your favorite deli meats, cheeses, and veggies for a satisfying sandwich. You can also use them as a slider base, adding mini-sized burger patties or pulled meats with your preferred condiments. Telera rolls are also great for making bruschetta or crostini by toasting them in the oven until crispy and topping them with fresh tomatoes, basil, and olive oil.
    They can also be served as a side with soups, stews, or chili, providing a soft and fluffy bread to accompany your meal. Whether used for sandwiches, appetizers, or alongside hearty dishes, Telera rolls are sure to add a delicious touch to any meal.
    Additional Suggestions on How to use Telera Bread:
    The following types of sandwiches are perfect for Telera:
    • Sandwich de Lomito Completo (Paraguayan Style Steak Sandwich)
    • Tenderloin Sandwich
    • Pan con Pollo
    • Pan con Pavo
    • Tenderloin Sandwich with Sweet-Sour honey mustard
    How to Store & Re-Heat
    Once baked, telera rolls can be stored at room temperature for up to 3 days or 5 days in the refrigerator in a plastic storage bag or wrapped in aluminum foil. To reheat, microwave it until heated through or warm it up in a 350 F preheated oven for 10 to 15 minutes; wrap the bread in aluminum foil to keep the crust soft and tender as it warms up.
    Make-Ahead
    Telera dough can be made a day ahead, punch down the dough, cover, and refrigerate the dough overnight after the first rise. Then, shape the dough as directed in the recipe and let it rise a second time until light and doubled in size, 25 to 35 minutes.
    How to Freeze
    Allow the baked telera rolls to cool completely on a wire rack before wrapping them in plastic wrap and placing them in a freezer zip-top freezer bag to keep them fresh. Store them in the freezer for up to 3 months. When you're ready to eat it, gently reheat it from frozen in a preheated to 350°F for 10 to 15 minutes.
    Nutrition Facts
    How to Make Telera Roll
    Amount per Serving
    Calories
    229
    % Daily Value*
    Fat
     
    3
    g
    5
    %
    Saturated Fat
     
    1
    g
    6
    %
    Trans Fat
     
    0.3
    g
    Polyunsaturated Fat
     
    1
    g
    Monounsaturated Fat
     
    1
    g
    Sodium
     
    391
    mg
    17
    %
    Potassium
     
    61
    mg
    2
    %
    Carbohydrates
     
    43
    g
    14
    %
    Fiber
     
    2
    g
    8
    %
    Sugar
     
    2
    g
    2
    %
    Protein
     
    7
    g
    14
    %
    Vitamin A
     
    1
    IU
    0
    %
    Vitamin C
     
    0.002
    mg
    0
    %
    Calcium
     
    10
    mg
    1
    %
    Iron
     
    1
    mg
    6
    %
    * Percent Daily Values are based on a 2000 calorie diet.

    All nutritional information is based on third-party calculations and is only an estimate. Each recipe and nutritional value will vary depending on the brands you use, measuring methods, and portion sizes per household.

    Did you Like the Recipe?We would appreciate it if you could rate it. Also, make sure to check out our Youtube Channel for more great recipes. Please share it on social media and tag us so we can see your delicious creations. Thank you!
    « Torrejas: The Best French Toast (Latino-Style)
    Strawberry Muffins »

    Primary Sidebar

    About

    Hello and welcome! I’m Camila, a food-enthusiast mom who adores the comfort of rainy days and has a passion for culinary creativity. As an avid baker and cook, I find tranquility in the kitchen, where I can whip up delightful treats and delicious meals for my family. I believe that food brings people together and creates unforgettable memories. Thanks you for stopping by!

    More about me →

    Cakes Recipes

    • Strawberry Sheet Cake with Strawberry Cream Cheese Frosting
      Strawberry Sheet Cake with Strawberry Cream Cheese Frosting
    • Carrot Sheet Cake with Cream Cheese Frosting 9
      Carrot Sheet Cake with Cream Cheese Frosting
    • Cherry Upside Down Cake
      Cherry Upside Down Cake
    • Perfect Pineapple Upside Down Cake
      Pineapple Upside Down Cake
    PSALM 119 The Word of God

    30-Minute (8) All Recipes (735) Appetizer (31) Apple (14) Asian (47) Bacon (6) Baked (18) Banana (16) Bars (9) Beans (9) Beef (39) Biscuits (9) Blueberry (13) Brazilian (28) Bread (37) Breakfast (45) Brownies (7) Butter (9) Cakes (50) Candy (9) Caramel (9) Casserole (9) Cheese (28) Cherry (8) Chicken (52) Chinese (30) Chipa (13) Chipotle (10) Chocolate (45) Christmas (24) Cinnamon (10) Cocktails (10) Cocoa (11) Coconut (10) Coffee (20) Cold Drinks (26) Condensed Milk (9) Cookies (34) Cornbread (6) Cornmeal (8) Cream Cheese (11) Dinner (38) Dip (8) Dough (7) Drinks (13) Dulce de Leche (7) Egg (19) Empanadas (10) Fall (35) Fish (11) Flan (9) Fruit (8) Ginger (6) Healthy (70) Holidays (67) Honey (9) Hot Drinks (26) How To & Tips (13) Ice Cream (8) International Food (78) Irish (7) Italian (12) Juice (8) Lemon (12) Lime (9) Lunch (22) Maple (7) Mexican (27) Middle Eastern (6) Muffins (26) Oats (10) Orange (7) Pancakes (7) Paraguayan Food (79) Pasta (20) Pecan (8) Pies (11) Pizza (9) Potatoes (14) Pumpkin (20) Quick Meal (24) Rice (15) Salad (15) Salsa (6) Sandwiches (7) Sauce & Seasoning (46) Scones (11) Seafood (8) Side Dishes (67) Soup (11) Spicy (16) Spinach (8) Steak (9) Stir-fry (9) Strawberry (15) Sugar-Free (9) Sweet (100) Sweet Potato (12) Thanksgiving (28) Whole Wheat (24)

    Cookies Recipes

    • Soft Chocolate Chip Cookies 5
      Soft Chocolate Chip Cookies
    • Coconut Macaroons
      Easy Coconut Macaroons
    • The Best Mexican Wedding Cookies 4
      Mexican Wedding Cookies
    • Coconut Chocolate Chip Cookies 10
      Coconut Chocolate Chip Cookies

    There’s no content to show here yet.

    Bread Recipes

    • The Best Potato Breads Recipe 1
      Potato Bread
    • Easy Dinner Rolls 5
      Dinner Rolls
    • Bread for Tortas 1
      Bread For Tortas
    • Bread with Cornmeal 5
      Bread with Cornmeal

    Never Miss a Recipe!

    Join our Camila Made subscribers and get our best recipes delivered each week!

    • Pinterest
    • YouTube

    Footer

    ↑ back to top

    Desserts

    • Pies
    • Cakes
    • Muffins
    • Cookies
    • More Sweet Recipes

    Courses

    • Appetizer
    • Breakfast
    • Lunch
    • Dinner
    • Side Dishes

    Features

    • Asian
    • Healthy
    • Holidays
    • Paraguayan Food
    • International Food

    About

    • About
    • Privacy Policy
    • Youtube Channel
    • Recetas En Español
    • Sign Up! Never Miss a Recipe

    This site contains affiliate links. Your clicks and purchases help support Camila Made at no extra charge to you.

    Copyright © 2023 Camila Made | All Rights Reserved

    x
    x