Easy Brazilian Coxinha
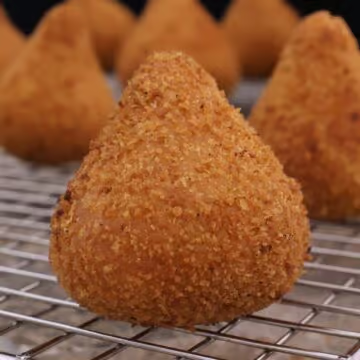
Coxinha is a popular Brazilian snack for its crispy outer layer and flavorful filling. This teardrop-shaped delicacy is made by molding a mixture of shredded chicken, cream cheese, and spices into a drumstick, coating it with breadcrumbs, and then deep-frying it to perfection. Coxinha has become a favorite appetizer or snack among foodies worldwide with its rich and savory taste. Whether enjoyed as party food or a quick bite, Coxinha is sure to satisfy your cravings and take your taste buds on a delightful journey to Brazil.😉
[gtranslate]
Ingredients
For the filling:
- 1 Rotisserie Chicken or 1 kg of any cooked and shredded chicken, such as poached or leftover roasted chicken.
- 1 large onion
- 3 cloves garlic
- 1 tablespoon Goya chicken flavor bouillon
- 2 bunches green onion , finely chopped
- 1 8 oz package of cream cheese (room temperature)
- 3 Tablespoons olive oil
- 2 Tablespoons tomato paste, ¼ cup tomato sauce, or 1 tablespoon paprika (Just for color, not too much)
- 2 teaspoons ground black pepper , adjust to taste
- ¼ cup water . if using tomate paste
For the dough:
- 4 tablespoons knorr chicken flavored bouillon
- 8 cups whole milk
- 1 kg all-purpose flour
- 1 cup mayo
- 1 tablespoon sweet paprika or 1 teaspoon ground turmeric
For the Coating:
- 2 cups Plain Breadcrumbs
- ½ cup water
- 1 Teaspoon cornstarch
- 2 liters Peanut or Vegetable oil for frying
Instructions
For the Coxinha Filling:
- In a food processor, add the chopped onion and garlic. Pulse a few times to chop them finely. Transfer the mixture to a small bowl and set aside. Add the roast chicken meat in batches in the same container of the food processor. Pulse a few times to chop it coarsely. Be careful not to over-process; you want finely chopped chicken, not puree. Transfer the mixture to a large bowl and set aside.
- In a large saucepan, heat olive oil over medium heat. Sauté the finely chopped onions and garlic for about 5 to 10 minutes until they become translucent. Add the tomato paste and cook for an additional 2 minutes. Stir in the water, chicken bouillon, and pepper. Add the shredded chicken and chopped green onions to the saucepan and stir until well combined and the chicken is heated thoroughly. Taste the filling and adjust the seasoning if needed. Remove from heat and set aside.
For the Coxinha Dough:
- For the dough, in a large, heavy pot over high heat, bring the milk, chicken bouillon, and mayonnaise to a boil. Add the sifted flour and stir continuously and vigorously until a smooth dough comes together and away from the sides of the pan as you stir for about 5 to 6 minutes. Turn the dough onto an electric stand mixer fitted with a paddle attachment and knead on medium-low speed until smooth and bouncy, ensuring there are no lumps; about 5 minutes. Transfer the dough to a lightly oiled bowl, turning it to coat the surface, and cover it with a clean kitchen towel. Alternatively, if you prefer, you can also make the dough by hand with the help of a dough scraper or rolling pin. Knead the dough until it becomes smooth and bouncy.
Camila's Tip:
- The coxinha dough is ready to knead when it unsticks from the pan and doesn't stick to your hands when nd doesn't cling to your hands when you pinch it.
Assemble the Coxinhas:
- Take a small portion of the dough (approximately 35g or depending on how big you want your coxinhas to be), and form a ball. Flatten the dough in your palm into a disc with a slight lip at the edges, creating a hollow in the middle. Be careful not to make it too thin, as it may tear when folding. Place about 1 teaspoon of cream cheese into the center of the dough. Add a scant tablespoon to 2 tablespoons of the prepared filling into the center of the dough.
Note:
- This recipe yields medium-sized coxinhas. If you prefer larger coxinhas, use about 110g to 120g of dough for each coxinha. However, keep in mind that larger coxinhas will yield a smaller quantity, approximately 20 coxinhas since they are bigger. Enjoy your larger and more indulgent coxinhas!
- Bring the edges of the dough disc together to cover the filling entirely. Pinch the edges together gently to seal the dough shut. Hold the dough-covered filling in one hand with the sealed edge facing up. Use your other hand to pinch and pull the top of the dough (opposite the sealed edge) to create a pointy tip. This will form a drumstick/teardrop-like shape.
- If the top end of the drumstick is too long, gently break it to the desired length and fix it to look like a nice drumstick. Gently smooth the surface of the coxinha with your hands, making sure there are no cracks or openings where the filling could leak out during frying. Continue shaping coxinhas until you run out of dough and filling. If the dough breaks or tears while shaping the coxinhas, don't worry. Coxinha dough is very forgiving, much like playdough. You can simply patch it back together with your fingers and reshape it into a drumstick shape again.
- In a small bowl, whisk 1 teaspoon of cornstarch with ½ cup of water. Microwave the mixture for about 2 minutes until the cornstarch cooks through and turns slightly slimy. Alternatively, heat it on the stovetop. Let the mixture cool slightly, then coat your hands with the cornstarch mixture. Coat each Coxinha with the cornstarch mixture, then coat them with breadcrumbs, ensuring they are evenly covered. Set the coated Coxinhas aside on a baking sheet and continue to cover all of them.
Fry the Coxinha:
- Heat oil in a large saucepan over medium heat. Aim for a temperature of around 350°F / 180°C. If you don't have a cooking thermometer, you can check the oil's readiness using a clean toothpick or a tiny ball of dough. When you drop the toothpick or dough into the hot oil, it should start fizzling immediately and rise to the top of the pan instantly, indicating that the oil is hot enough for frying.
- When the oil is hot enough, deep fry the Coxinhas in batches bout 5 at a time) until they turn golden brown, about 5 to 6 minutes. Place the fried Coxinhas on a plate lined with paper towels to absorb excess oil. If you wish, you can keep your cooked coxinha warm in a 250°F/120°C oven while you continue with the rest.
Camila's Tip:
- Wait to make the dough until you finish the filling. It is easier to work with the dough when it's warm instead of cold, as it develops a crust when left sitting for too long. Additionally, keep the dough covered with a damp cloth or plastic wrap while shaping the Coxinhas to maintain its moisture and prevent it from drying out.
Notes
How to Store & Re-Heat
To storage: Once the Coxinha has cooled down, store them in an airtight container in the refrigerator for up to 3 days. Alternatively, you can freeze the Coxinha for up to 2 months. Be sure to wrap them individually in plastic wrap or aluminum foil before storing them in an airtight container or freezer bag.
To reheat: Preheat your oven to 350°F (175°C). Place the Coxinha on a baking sheet and heat them in the oven for about 10-12 minutes or until they are heated through and crispy again. You can also reheat them in an air fryer for a few minutes until crispy. You can also reheat the Coxinha in the microwave. Place them on a microwave-safe plate and microwave on high for 30 seconds to 1 minute or until they are heated through. However, this may result in a softer texture.
Make-Ahead
To make ahead Coxinha, prepare the dough and filling as directed in the recipe, shape them into teardrop shapes, coat them in breadcrumbs, and freeze them on a baking sheet for at least 2 hours. Once frozen, transfer the Coxinha to a freezer-safe container or bag, label it with the date, and freeze for up to 2 months. Next, preheat your oven to 350°F (175°C) when ready to serve, place the frozen Coxinha on a baking sheet, and bake them for 15-20 minutes or until heated through and crispy. You can also reheat them in an air fryer for a few minutes until crispy. This make-ahead method saves time and ensures you always have a tasty snack or meal.
How to Freeze
To freeze Coxinha, first, prepare the dough and filling as directed in the recipe, shape them into teardrop shapes, coat them in breadcrumbs, and arrange them on a baking sheet lined with parchment paper. Next, place the baking sheet in the freezer and freeze the Coxinha for at least 2 hours or until they are completely frozen. Once frozen, transfer the Coxinha to a freezer-safe container or bag, and return it to the freezer.
The Coxinha can be stored in the freezer for up to 2 months. When you are ready to serve, remove the desired amount of frozen Coxinha from the freezer, place them on a baking sheet lined with parchment paper, and bake them in a preheated oven at 350°F (175°C) for 15-20 minutes or until they are heated through and crispy. Alternatively, you can reheat them in an air fryer for a few minutes until crispy.
Nutrition Facts
Easy Brazilian Coxinha
Amount per Serving
Calories
111
% Daily Value*
Fat
4
g
6
%
Saturated Fat
1
g
6
%
Trans Fat
0.01
g
Polyunsaturated Fat
1
g
Monounsaturated Fat
1
g
Cholesterol
11
mg
4
%
Sodium
137
mg
6
%
Potassium
69
mg
2
%
Carbohydrates
13
g
4
%
Fiber
1
g
4
%
Sugar
2
g
2
%
Protein
5
g
10
%
Vitamin A
97
IU
2
%
Vitamin C
0.4
mg
0
%
Calcium
39
mg
4
%
Iron
1
mg
6
%
* Percent Daily Values are based on a 2000 calorie diet.
All nutritional information is based on third-party calculations and is only an estimate. Each recipe and nutritional value will vary depending on the brands you use, measuring methods, and portion sizes per household.
Did you Like the Recipe?We would appreciate it if you could rate it. Also, make sure to check out our Youtube Channel for more great recipes. Please share it on social media and tag us so we can see your delicious creations. Thank you!