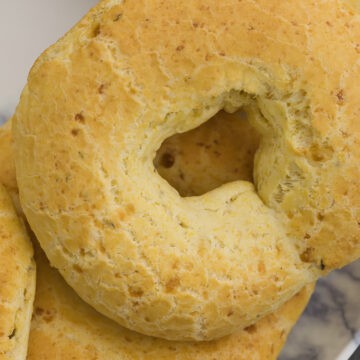
Easy Chipa
Tapioca starch with cornmeal is a perfect combination of flavors. This traditional Paraguayan chipa recipe is easy to prepare and consistently yields a perfect result: a crunchy crust and a slightly chewy interior with delicious corn flavor. Additionally, it's gluten-free. Chipa is delicious not only when served warm and fresh from the oven but also at room temperature, and it freezes well, making it convenient for later use. It's a popular choice for breakfast and pairs wonderfully with Mate Cocido or Coffee.
[gtranslate]
Tools
- (2) 13" x 18" Baking Sheet
- Extra large mixing bowl
- Measuring Cups & Spoons
Ingredients
- 500 g Yuca Starch also know as Tapioca Starch
- 150 g Quaker yellow cornmeal
- 2 teaspoons Non-Aluminum baking powder Traditional chipa doesn’t contain baking powder, but I like to add it to make it lighter and fluffier.
- 400 g Shredded Mexican cheese
- 150 g Softened butter I use butter in this recipe because I prefer its flavor, but alternatives like shortening or margarine can also be used.
- 118 ml (about ½ cup plus 1 tablespoon) Buttermilk or whole milk, room temperature See my instructions for how to make homemade buttermilk 👉 here.
- 4 large Eggs , room temperature
- 1 teaspoon Kosher salt , or to taste
- 1 tablespoon Anise Seeds Optional, but highly recommended.
Instructions
- Preheat your oven to 500°F (260°C) and line two 13x18x1 baking sheets with parchment paper.
- In a large mixing bowl, combine tapioca starch, cornmeal, salt, anise, and baking powder.
- On a clean work surface, pour out the yuca starch mixture and form a well in the center. Add softened butter and eggs, mixing them into the starch with your fingers until creamy.
- Gradually incorporate the dry ingredients into the wet mixture by hand until a coarse crumb forms. (The coarse crumb should appear loose but hold together when pressed.)
- Mix in cheese until well integrated.
- Slowly add buttermilk, just enough to make the dough easy to knead but not too firm. Knead by hand until the dough is compact and moist. Note: you may not need to use all the buttermilk; if it becomes too soft, add a little more tapioca flour.
- Knead the dough using the heel of your hand to push it away from you, then gather it back using a bench scraper. Continue until the dough is smooth, compact, and no longer sticks to the surface or your hands, about 4-5 minutes. Note: The dough should have a smooth playdough-like consistency when done.
- Cover the dough with a clean kitchen towel and let it rest for 15-20 minutes.
- To shape the chipas, pinch off a piece of dough and roll it into a ball, about 130g each. Roll into an 8-inch log, join the ends to form a circle, and press to seal. For diagonal shapes, roll into a 9-inch long, 2-inch diameter log and cut into 3-inch diagonal slices.
- Place shaped dough on the prepared baking sheets and bake until lightly golden and puffed, about 12-15 minutes. Do not overcook. Serve immediately.
Notes
How to Store & Re-Heat
Chipa tastes best when served fresh out of the oven, but it can be stored in an airtight container or sealable plastic bag at room temperature for up to 3 days or refrigerated for up to 5 days.
Warm the cheese bread in the microwave for a few seconds or until just heated through; do not overheat, or it will get tough. Alternatively, you can wrap the bread in aluminum foil and warm it in a 350°F oven until hot.
Make-Ahead & Freeze
You can prepare the Chipa dough a day before and store it covered in the fridge for up to 24 hours. When ready to bake, remove it from the refrigerator and let it sit at room temperature for 20 minutes. Briefly knead the dough, shape it according to the recipe instructions, and bake as directed.
For freezing Chipa, shape the dough and place it on a parchment-lined baking sheet. Cover with plastic wrap and freeze until firm, about 2 hours. Once frozen, transfer them to a freezer-safe container or bag, remove excess air, and store in the freezer for up to 3 months.
To bake, preheat the oven to 500°F (260°C). Transfer the frozen chipas straight from the freezer to a baking sheet, and bake for 15 to 25 minutes, adjusting the baking time as needed. Serve immediately
Nutrition Facts
Easy Chipa
Amount per Serving
Calories
324
% Daily Value*
Fat
16
g
25
%
Saturated Fat
9
g
56
%
Trans Fat
1
g
Polyunsaturated Fat
1
g
Monounsaturated Fat
4
g
Cholesterol
85
mg
28
%
Sodium
419
mg
18
%
Potassium
110
mg
3
%
Carbohydrates
38
g
13
%
Fiber
1
g
4
%
Sugar
1
g
1
%
Protein
8
g
16
%
Vitamin A
543
IU
11
%
Vitamin C
0.1
mg
0
%
Calcium
212
mg
21
%
Iron
1
mg
6
%
* Percent Daily Values are based on a 2000 calorie diet.
All nutritional information is based on third-party calculations and is only an estimate. Each recipe and nutritional value will vary depending on the brands you use, measuring methods, and portion sizes per household.
Did you Like the Recipe?We would appreciate it if you could rate it. Also, make sure to check out our Youtube Channel for more great recipes. Please share it on social media and tag us so we can see your delicious creations. Thank you!