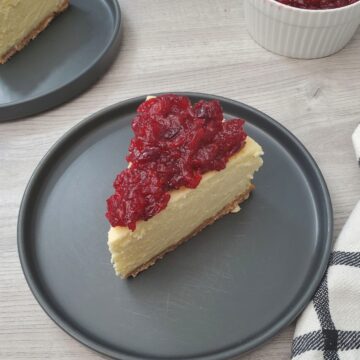
Easy Cheesecake with Cranberry Compote
Cheesecake with Cranberry Compote is a beloved dessert that holds a special place in our household, particularly for my husband, who absolutely adores it. This delightful treat combines the creaminess of cheesecake with the tangy twist of cranberry compote. With its simple preparation and easily accessible ingredients, it's a recipe that anyone can master. Whether it's a festive gathering or a simple craving for something sweet, this Cheesecake with Cranberry Compote is a must-try delicacy that is bound to become a beloved favorite in your home too.
Tools
- 9- or 10-inch springform pan
- 18-inch heavy-duty aluminum foil
- Large Roasting Pan
Ingredients
For the Crust:
- 1-½ cups Nilla Wafers or graham cracker , crumbs
- 2 tablespoons sugar
- 5 tablespoons unsalted butter , melted
For the Filling:
- 4 pkg (8 oz. each) Cream Cheese, at room temperature
- 2 cups sugar , level off
- 1 Tablespoon pure vanilla extract
- 6 large eggs , at room temperature
- ¼ cup full-fat sour cream , at room temperature
- ¼ cup heavy cream or full-fat sour cream , at room temperature
- 1 tablespoon freshly squeezed lemon juice
- Zest from 1 lemon
For the Cranberry Compote:
- 1 ( 12 oz) fresh Cranberry, washed and dried
- ½ cup granulated sugar , depending on the level of sweetness you desire
- ½ cup light brown sugar , depending on the level of sweetness you desire
- ½ cup water
- ½ teaspoon ground cinnamon
- ¼ teaspoon kosher salt
Instructions
For the Cranberries Compote:
- In a medium saucepan, combine the fresh cranberries, granulated sugar, light brown sugar, water, ground cinnamon, and kosher salt. Bring the mixture to a boil over medium heat, stirring occasionally. Reduce the heat to low and simmer for about 15 to 20 minutes, or until the cranberries begin to break down slightly and thicken a bit. Remove the saucepan from the heat and leave to cool before spreading on the cheesecake. The Cranberry Compote can be refrigerated in an airtight container for up to 5 days.
- For the crust:
- Preheat oven to 375°F. Process the Nilla Wafers or graham crackers and sugar in a food processor to a fine crumb. In a medium bowl, combine the cookie crumbs, melted butter, and sugar. Mix until evenly moistened and well combined. Pour into a 9-inch springform pan. With your hands, press the crumbs into the bottom of the pan and about 1 inch up the sides. Bake the crust for 10 minutes. Remove the crust from the oven and set it aside to cool. Reduce the oven temperature to 325°F.
- For the Filling:
- Wrap a 10-inch springform pan with a large piece of aluminum paper, covering the underside and extending all the way to the top so there are no seams on the bottom or sides. Repeat with a few more sheets of foil for insurance. The foil will keep the water from seeping into the cheesecake.
- In the bowl of a stand mixer, attach the paddle attachment. Place the cream cheese in the bowl and beat it on medium speed for about 1 minute until it becomes smooth and no lumps remain. Gradually add the sugar while continuing to beat the mixture. Beat for an additional 1 to 2 minutes until the mixture becomes creamy. Scrape down the sides and bottom of the bowl using a spatula to ensure all ingredients are well incorporated. Add the vanilla, lemon juice, and lemon zest to the mixture. Beat them into the cream cheese mixture until everything is well combined.
- Add the eggs, 1 at a time, and continue to beat slowly until combined, scraping after each addition. Add sour cream and heavy cream. Periodically scrape down the sides of the bowl and the paddle. The batter should be well-mixed but not over-beaten. Pour the filling into the crust-lined pan and smooth the top with a spatula. Place the foil-wrapped springform pan in a large roasting pan.
- Pour boiling water into the roasting pan until the water is about halfway up the sides of the cheesecake pan. Bake for 1 hour and 30 minutes to 1 hour and 45 minutes. The cheesecake should still jiggle (it will firm up after chilling), so be careful not to overcook. Let cool in the pan for 30 minutes.
- Chill in the refrigerator, loosely covered, for a least 8 hours or overnight. Loosen the cheesecake from the sides of the pan by running a thin metal spatula around the inside rim. Unmold and transfer to a serving platter or cake stand. Using a spatula, spread a layer of warm Cranberry Compote over the surface. Slice the cheesecake with a thin, non-serrated knife that has been dipped in hot water. Wipe dry after each cut.
Notes
Make-Ahead
Prepare the cheesecake as directed in the recipe. Once the cheesecake is baked, allow it to cool to room temperature in the pan. Once cooled, place the cheesecake, still in the pan, in the refrigerator to chill as directed. Do not cover the cheesecake until it is completely cold. Once the cheesecake is cold, cover it with clingfilm, making sure the covering does not touch the surface of the cheesecake. This prevents condensation and maintains its texture. Store the covered cheesecake in the refrigerator for up to 5 days. When you are ready to serve the cheesecake, remove it from the refrigerator. Add the cranberry compote on top of the cheesecake just before serving.
How to Freeze
The cheesecake without the topping can be frozen for up to 3 months; make sure it is thoroughly chilled, then wrap it, still in its tin, in a double layer of clingfilm and a double layer of foil, ensuring that the wrapping doesn't touch the top surface. Defrost overnight in the fridge and eat within 3 days. (Add cranberry compote only when serving).
Nutrition Facts
Easy Cheesecake with Cranberry Compote
Amount per Serving
Calories
387
% Daily Value*
Fat
12
g
18
%
Saturated Fat
6
g
38
%
Trans Fat
0.2
g
Polyunsaturated Fat
1
g
Monounsaturated Fat
3
g
Cholesterol
123
mg
41
%
Sodium
134
mg
6
%
Potassium
79
mg
2
%
Carbohydrates
67
g
22
%
Fiber
0.3
g
1
%
Sugar
65
g
72
%
Protein
4
g
8
%
Vitamin A
441
IU
9
%
Vitamin C
1
mg
1
%
Calcium
41
mg
4
%
Iron
1
mg
6
%
* Percent Daily Values are based on a 2000 calorie diet.
All nutritional information is based on third-party calculations and is only an estimate. Each recipe and nutritional value will vary depending on the brands you use, measuring methods, and portion sizes per household.
Did you Like the Recipe?We would appreciate it if you could rate it. Also, make sure to check out our Youtube Channel for more great recipes. Please share it on social media and tag us so we can see your delicious creations. Thank you!