Easy Red Velvet Cupcakes
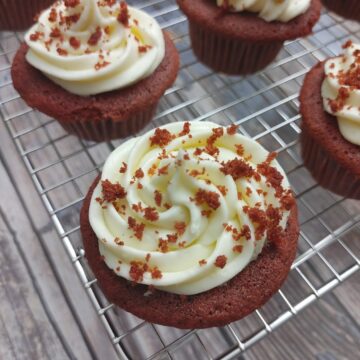
With Valentine's Day approaching, now is the time to start thinking about a romantic dessert, such as this Red Velvet Cupcake, made with vanilla cake batter and a touch of cocoa. The crimson chocolate cake is topped with velvety Cream Cheese frosting and red velvet crumbs for a perfect finish.
Ingredients
For the Red Velvet Cupcakes:
- 375 g (3 cups) all-purpose flour
- 450 g (2-¼ cups) granulated sugar
- 15 g ( 1 tablespoon) baking powder
- 5 g (1 teaspoon) baking soda
- ½ teaspoon Kosher salt
- 30 g (4 tablespoons) unsweetened cocoa powder
- 170 g (1 stick plus 4 tablespoons) unsalted butter , at room temperature
- 62.5 ml (¼ cup) avocado oil
- 425 ml (1-¾ cups) buttermilk , at room temperature
- 3 large eggs, at room temperature
- 1 oz (2 tablespoons/ 28g ) gel based red food coloring such as Red Red Wilton brand or liquid red food coloring
- 15 ml (1tablespoon) white distilled vinegar
- 15 ml (1 tablespoon) pure vanilla extract
- 10 ml (2 teaspoons) Grand Marnier or pure vanilla extract
For the Cream Cheese Frosting:
- 226g (8 oz) full-fat cream cheese, softened
- 248 g (2 cups) sifted confectioners’ sugar
- 113 g (1 stick) unsalted butter, softened
- ½ tablespoon pure vanilla extract
- ½ tablespoon clear vanilla
- ½ tablespoon powdered milk such as Nido Brand optional
Instructions
For the Red Velvet Cupcakes
- Preheat the oven to 350. Line three cupcake pan with paper liners. Lightly grease the tops of the pans with nonstick cooking spray. In a large bowl, sift together the flour, baking powder, and cocoa powder. In another large bowl, whisk together the buttermilk, food coloring, vanilla extract, and clear vanilla.
- In the bowl of a stand mixer with the paddle attachment, cream the butter, avocado, sugar, salt, and butter on medium speed until lightened in color, about 2 to 3 minutes. Stop the mixer and scrape down the sides of the bowl with a spatula. Return the mixer to medium speed and slowly add the eggs and beat until they are fully incorporated.
- At low speed, add the buttermilk mixture and the flour mixture alternately in thirds to the mixer bowl, beginning with the buttermilk mixture and ending with the flour mixture. Mix until just combined and a smooth batter is formed. In a small bowl, mix the vinegar and baking soda, and when it foams, add it to your cupcake batter. Fold it in just until it’s combined, about a minute. Be careful not to overmix the batter!
- Divide the cake batter evenly among the prepared cupcake pans, filling ¾ of the way full. Bake, the red velvet cupcakes for 25 to 30 minutes or until the cupcakes, pulls away from the side of the pans and a toothpick is inserted in the center of the red velvet cupcakes comes out clean. Let the red velvet cupcakes cool on a wire rack for about 15 minutes, remove the red velvet cupcakes from the pans, and set them on a wire rack to cool completely.
How to Make Cream Cheese Frosting
- In a standing mixer fitted with the paddle attachment or with a hand-held electric mixer in a large bowl, mix the cream cheese, powdered sugar, butter, and powdered milk if using on low speed until incorporated. Increase the speed to high, and mix until just combined about 5 minutes. (Occasionally turn the mixer off, and scrape down the sides of the bowl with a rubber spatula.) Don’t whip!
- Reduce the speed of the mixer to low. Add the pure vanilla extract and clear vanilla, raise the speed to high and mix briefly until smooth (scrape down the bowl occasionally). Store in the refrigerator until somewhat stiff before using.
How to Assemble
- In the bowl of a food processor, add 1 red velvet cupcake. Pulse until fine crumbs and set aside. Alternatively, you can crumble with your fingers.
- Transfer the frosting to a pastry bag fitted with a large star tip. Decoratively pipe the frosting onto the red velvet cupcakes. Sprinkle the top of each cupcake with the red velvet cupcakes crumbs. Enjoy!
Notes
How to Store & Re-Heat
To store: Ensure your red velvet cupcakes are completely cooled before storing them. Place them in a container or cover them tightly with plastic wrap to prevent them from drying out. Store them at room temperature for up to 2 days. If you need to store them for a more extended period, you can refrigerate them for up to 4-5 days, but be aware that refrigeration may slightly alter the texture of the cupcakes.
To reheat: When it comes to reheating, it's generally best to enjoy red velvet cupcakes at room temperature. However, if you prefer to have them warm, gently reheat them in the microwave for a few seconds. Keep a close eye on them to avoid overheating and drying them out. Once reheated, allow them to cool slightly before serving.
Make-Ahead
To make red velvet cupcakes ahead of time, you can either bake them and store them unfrosted in an airtight container at room temperature for up to 2 days or refrigerate them for 4-5 days. Alternatively, you can frost the cupcakes in advance and refrigerate them for 2-3 days. Just make sure to allow refrigerated cupcakes to come to room temperature before serving.
How to Freeze
Freezing red velvet cupcakes is a great option for longer-term storage. To freeze them, first, ensure that the cupcakes are completely cooled. Place them in a single layer on a baking sheet or tray and place them in the freezer until firm. Once frozen, transfer the cupcakes to airtight freezer-safe containers or zip-top freezer bags. Label them with the date for reference. They can be stored in the freezer for 2-3 months. When you're ready to enjoy the frozen cupcakes, remove them from the freezer and let them thaw in the refrigerator or at room temperature.
Once thawed, you can frost the cupcakes if desired, and they will be ready to serve. Freezing may slightly affect the texture of the cupcakes, but they should still be delicious. Properly stored and thawed, your frozen red velvet cupcakes can be convenient and tasty whenever needed.
Nutrition Facts
Easy Red Velvet Cupcakes
Amount per Serving
Calories
249
% Daily Value*
Fat
14
g
22
%
Saturated Fat
7
g
44
%
Trans Fat
1
g
Polyunsaturated Fat
1
g
Monounsaturated Fat
5
g
Cholesterol
41
mg
14
%
Sodium
133
mg
6
%
Potassium
54
mg
2
%
Carbohydrates
29
g
10
%
Fiber
1
g
4
%
Sugar
20
g
22
%
Protein
2
g
4
%
Vitamin A
354
IU
7
%
Vitamin C
1
mg
1
%
Calcium
47
mg
5
%
Iron
1
mg
6
%
* Percent Daily Values are based on a 2000 calorie diet.
All nutritional information is based on third-party calculations and is only an estimate. Each recipe and nutritional value will vary depending on the brands you use, measuring methods, and portion sizes per household.
Did you Like the Recipe?We would appreciate it if you could rate it. Also, make sure to check out our Youtube Channel for more great recipes. Please share it on social media and tag us so we can see your delicious creations. Thank you!