
If you're a fan of cheesy bread, you must try the Paraguayan Inspired Chipa Buns or cheese buns, a perfect twist on the classic Paraguayan Chipa. Made with a blend of tangy cheeses and a subtle hint of anise seeds, these buns offer an utterly unique and irresistible flavor combination you won't find anywhere else.
The light texture of the bread adds to the overall appeal, making it an ideal comfort food that can be enjoyed anytime, anywhere. Paraguayan cuisine is known for its diverse and flavorful dishes; the cheese buns are no exception.
They can be served for breakfast, as a mid-day snack, or alongside your favorite hearty meal, making them a versatile addition to any mealtime. For more chipa recipes, be sure to check out our Chipa Buns, Chipa Almidon, Chipa Asador, Chipa Muffins, Chipa Mestizo, and Chipa So’o.😋
Jump to:

What are Chipa Buns?
Chipa buns are a variation of Paraguayan chipa, and the traditional recipe typically calls for tapioca starch. However, this version of chipa buns uses a blend of tapioca starch and self-raising flour to achieve the desired texture and rise.
In addition to the starch and flour, the recipe for chipa buns usually includes eggs, butter, cheese, and sometimes anise seeds for flavor. The mixture is formed into small buns and baked until golden brown. The resulting chipa buns are crisp on the outside with a soft, chewy texture on the inside and have a slightly cheesy and savory taste.
Chipa Buns Ingredients
Note: The full ingredients list is provided in the recipe card below.
- Tapioca starch or Cassava starch: gives the buns a chewy texture and slightly sweet flavor.
- Self-raising flour: helps the buns to rise and gives them a lighter texture.
- Butter: adds richness and flavor to the buns.
- Cheese (such as Mexican 4 cheese): gives the buns a tangy and savory flavor and helps to bind the dough.
- Baking powder: helps the buns to rise and become fluffy.
- Anise seeds(optional): adds a subtle sweet and licorice-like flavor to the buns.
- Buttermilk: it provides moisture and helps to create a tender crumb. In the chipa buns recipe, buttermilk or whole milk can be used to achieve the desired texture and flavor. Buttermilk will add a slightly tangy taste to the buns, while whole milk will give them a creamier flavor. The choice of which to use will depend on personal preference and availability.
Tools you'll need
How to Make Chipa Buns
Note: The full instructions are provided in the recipe card below.
Preheat the oven to 375°F. In a large mixing bowl, combine the yuca starch or tapioca starch, salt, self-rising flour, and baking powder. Rub the anise seeds between your palms to release the flavor, then add them to the mixing bowl and stir to combine. Place the yuca starch mixture on a clean work surface and make a hole in the center. Add the softened butter and eggs to the hole, then use your fingers to mix the wet ingredients together until somewhat incorporated.
Add the yuca starch mixture into the wet mixture a little at a time until a crumbly dough forms. Add the shredded cheese and mix with your hands until everything is well mixed. Drizzle the buttermilk or whole milk a bit at a time, mixing with your hands until a compact and moist but not wet dough has formed.
Use the heel of your hand to smear the dough away from you until it finishes, then gather it back with a bench scraper and continue kneading until it becomes smooth and compact and easily detaches from the working surface and your hands. This process should take about 4 to 5 minutes.
When done, the dough should have the consistency of smooth play dough. Once you've achieved the perfect consistency, cover the dough with a clean kitchen towel and let it rest for at least 15 to 20 minutes before shaping. This resting time will allow the dough to relax and improve the texture of your final product. Cover the dough with a clean kitchen towel and rest for at least 15 minutes.
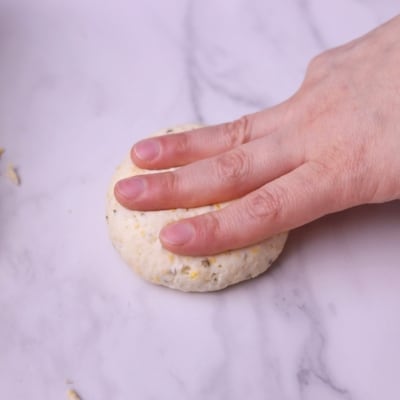
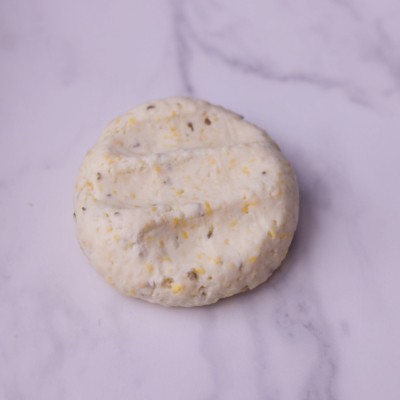
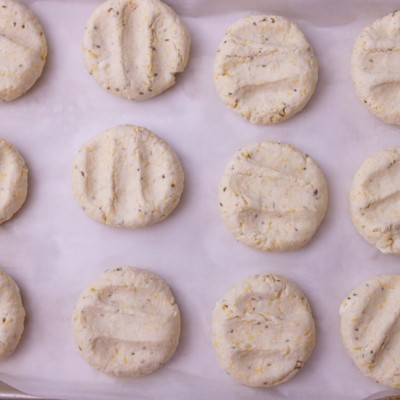
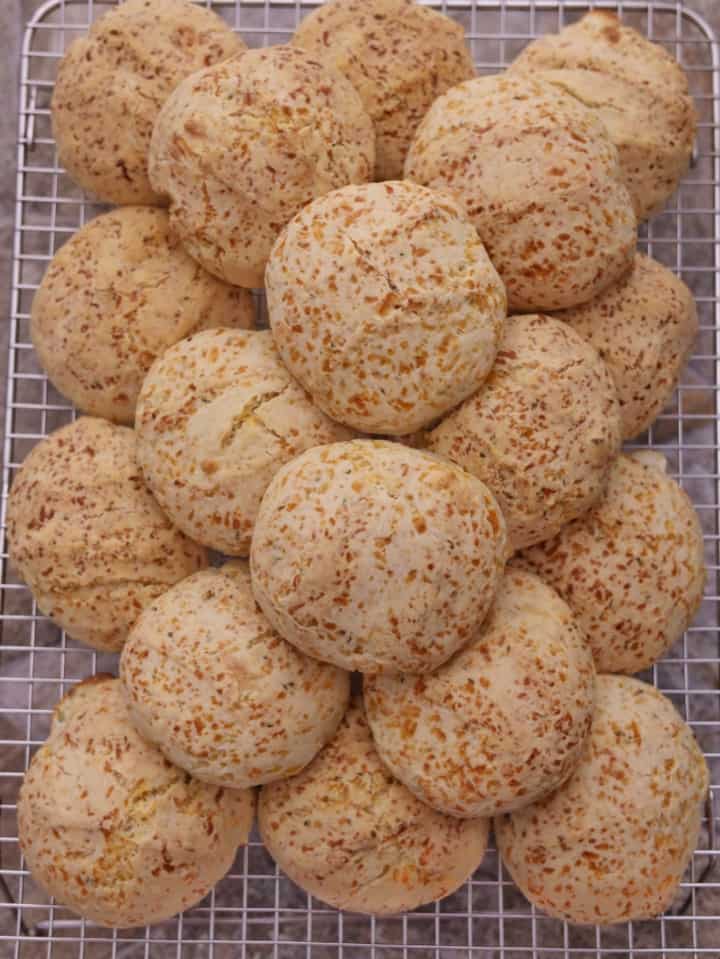
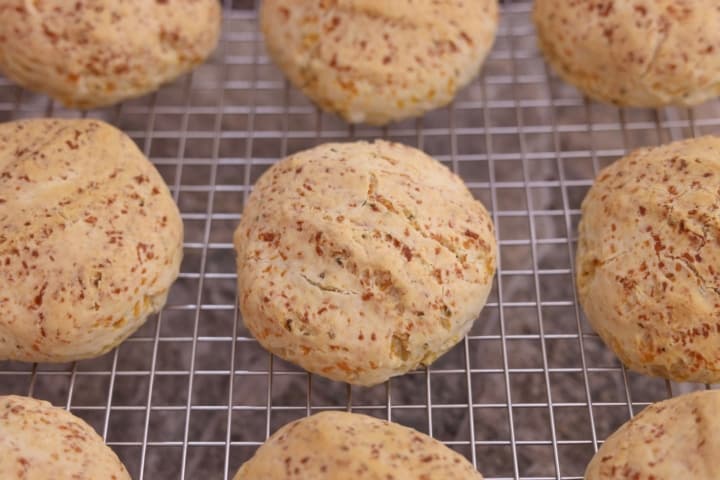
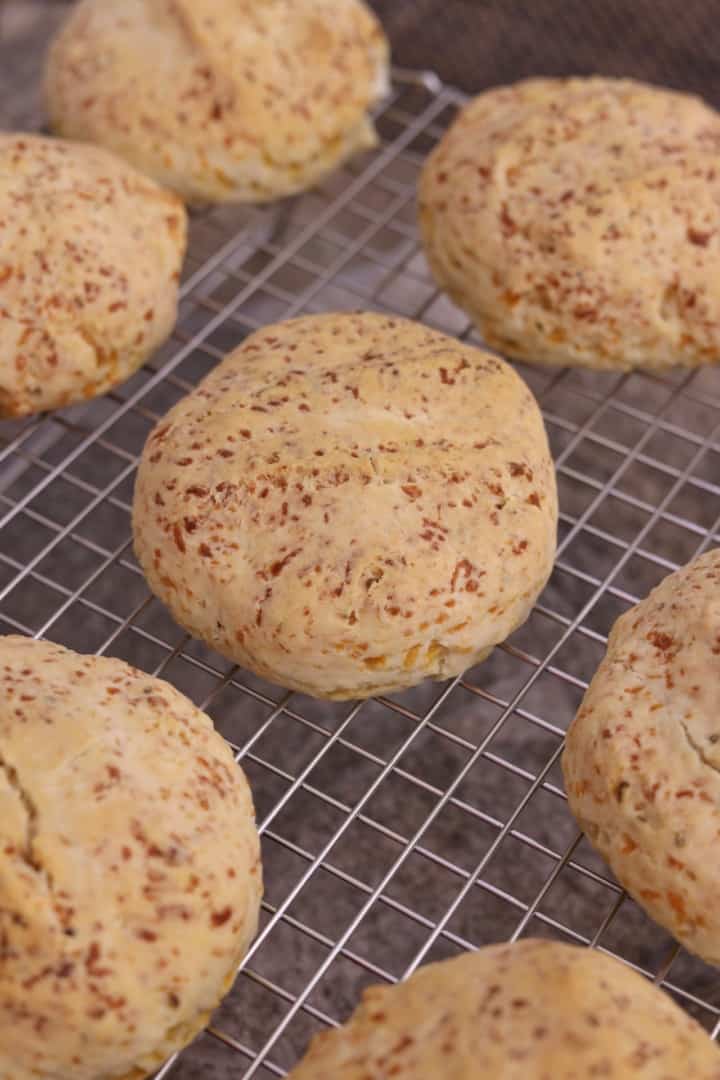
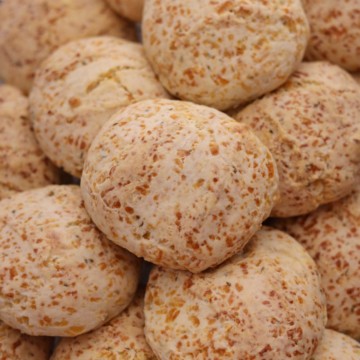
Divide the dough into 12 equal portions (about 125g each) and shape each into a ball. Place the balls on a greased baking sheet, then gently press down on each ball with three fingers to flatten slightly. Bake the chipa buns in the oven for 30 to 35 minutes or until they are puffed and golden brown. Allow the chipa buns to cool for a few minutes before serving, and enjoy!
Substitutions
- Tapioca starch: You can substitute tapioca starch with cassava flour or yucca flour for a similar texture and flavor.
- Mexican 4 cheese: You can substitute this with other types of cheese that melt well and have a tangy flavor, such as Parmesan, Queso de Freir, ”Frying cheese” Queso Blanco, Queso panela, Monterey Jack, Colby Jack, and cheddar.
- Anise seeds: You can omit the anise seeds if you prefer.
- Self-rising flour: You can make your self-rising flour by combining all-purpose flour with baking powder and salt. For each cup of all-purpose flour, add 1 ½ teaspoons of baking powder and ¼ teaspoon of salt.
- Buttermilk: You could make a homemade buttermilk substitute (click👉 here) or with a mixture of milk and plain yogurt.
Remember that substitutions may alter the taste and texture of the final product, so it's best to experiment and find the combination that works best for you.
Variations
Paraguayan cuisine has many delicious varieties of chipa buns and related dishes. Some popular variations include:
- Chipa kavure aramirõ (starch chipa kavure)
- Chipa 4 quesos (four-cheese chipa)
- Chipa jazmín (tapioca Starch and flour or self-rising flour)
- Chipa jehe'a (chipa mestizo-mestiza chipa)
- Chipa manduvi (peanut flour and starch chipa)
- Chipa pirú or chipita
- Chipa rora
- Chipa so'o (corn-based chipa with meat)
Each of these variations has its unique flavor and ingredients, but all are based on the traditional chipa recipe and are beloved by Paraguayans.
How to Serve
Chipa buns are delicious and versatile bread that can be served in many ways. Here are some ideas on how to serve and enjoy your freshly baked chipa buns:
- Serve with Mate Cocido, tea, or coffee: Chipa buns also make a great snack to enjoy with your favorite hot or cold beverage. Try pairing them with a cup of tea or coffee for a delicious and satisfying treat.
- Pair with savory dishes: The tangy and savory flavor of chipa buns makes them a perfect accompaniment to many savory dishes. Try serving them with soup, chili, stew, or grilled meats.
- Make a sandwich: Chipa buns can be sliced in half and used as a roll. Add your favorite fillings, such as ham, cheese, lettuce, and tomato, to create a tasty sandwich.
- Enjoy as a snack: Chipa buns are a great snack that can be enjoyed on their own or with a dipping sauce. You can dip them in spicy salsa, hummus, or guacamole.
How to Store & Reheat
To store your freshly baked chipa buns, allow them to cool completely to room temperature. Then, wrap them tightly in plastic wrap or store them in an airtight container. They can be stored at room temperature for up to 3 days or in the refrigerator for up to a week. To reheat the chipa buns, preheat your oven to 350°F (175°C). Remove the plastic wrap or the airtight container and place the buns on a baking sheet.
Cover the buns with aluminum foil and bake in the oven for about 5-10 minutes or until heated. Alternatively, you can also reheat the chipa buns in a microwave. Wrap the buns in a damp paper towel and microwave them for 10-15 seconds or until heated through. Be careful not to overheat them, as they may become tough and dry. It is important to note that reheated chipa buns may not be as crispy on the outside as they were when first baked.
However, they will still be delicious and enjoyable.
How to Make Ahead
Prepare the dough according to the recipe instructions and shape it into balls. Instead of baking the buns immediately, place them on a baking sheet and cover them with plastic wrap or a clean kitchen towel. You can then store the unbaked chipa buns in the refrigerator for up to 24 hours before baking or in the freezer for up to 3 months. Place the buns in an airtight container or a freezer-safe bag if stored in the freezer.
When you are ready to bake the chipa buns, remove them from the refrigerator or freezer and allow them to come to room temperature. If frozen, let them thaw in the refrigerator overnight. Once the buns have come to room temperature, follow the baking instructions in the recipe to bake them until they are puffed and golden brown. By following these steps, you can make chipa buns ahead of time and have fresh, delicious bread whenever you want it.
Just remember to store them properly and follow the instructions for reheating if needed.
How to Freeze
Allow the baked chipa buns to cool completely to room temperature. Wrap each bun tightly in plastic or aluminum foil to prevent freezer burn and moisture loss. You can also place the buns in a freezer-safe container or bag. Label the wrapped buns with the date of freezing to keep track of their freshness. Place the wrapped buns in the freezer and store them for up to 3 months.
When ready to use the frozen chipa buns, remove them from the freezer and allow them to thaw at room temperature for about an hour. To reheat the thawed chipa buns, preheat your oven to 350°F (175°C). Remove the plastic wrap or foil and place the buns on a baking sheet. Cover the buns with foil and bake in the oven for about 5-10 minutes or until heated.
By following these steps, you can freeze your chipa buns for later use and enjoy fresh, homemade bread anytime you want it.
Tips for Making The Best Chipa Buns
- Use a combination of cassava or tapioca starch and self-rising flour for the best texture and rise. This will give your chipa buns the signature chewy texture and lightness.
- Rub the anise seeds between your palms to release the flavor before adding them to the dough. This will ensure that the anise flavor is evenly distributed throughout the buns.
- Use room-temperature butter and eggs to help them incorporate better into the dough and create a smoother texture.
- Use shredded cheese that melts well and has a tangy flavor, such as Mexican blend cheese or a blend with Parmesan. This will add flavor and help bind the dough.
- Knead the dough until it becomes smooth and compact. This will help to develop the gluten and give the buns their chewy texture.
- Let the dough rest for at least 15 to 20 minutes before shaping it into balls. This will allow the dough to relax and make it easier to handle.
- Flatten the dough balls slightly before baking to create a crispy exterior and a soft and tender interior.
- Bake the chipa buns at a high temperature of 375°F to achieve the desired puffiness and golden brown color.
FAQ
Can I substitute tapioca starch with another type of starch?
While tapioca starch is the traditional ingredient in chipa buns, you can substitute it with cassava flour or yuca flour for a similar texture and flavor.
Can I make chipa buns without anise seeds?
Yes, you can omit the anise seeds if you prefer. However, they add a unique flavor to the buns that complement the cheese and other ingredients.
Can I use a different type of cheese?
While Mexican 4 cheese or Parmesan are the recommended cheeses for chipa buns, you can use any cheese that melts well and has a tangy flavor.
How do I know when the chipa buns are done baking?
When baking, the chipa buns should be puffed and golden brown on the outside. You can also test for doneness by tapping the bottom of the buns - they should sound hollow when done.
Can I freeze chipa buns?
Yes, you can freeze chipa buns for up to 3 months. Wrap them tightly in plastic wrap or aluminum foil, then place them in a freezer-safe container or bag. Thaw them at room temperature before reheating.
Can I make chipa buns without using self-rising flour?
Yes, you can make chipa buns without self-rising flour by substituting it with all-purpose flour and adding 1 teaspoon of baking powder per cup.
Can I use a different type of milk?
Yes, you can use any milk you prefer, such as almond or soy milk, as a substitute for buttermilk or whole milk.
How long should I knead the dough?
You should knead the dough for about 10-15 minutes or until it becomes smooth and compact. This will help to develop the gluten and give the buns their chewy texture.
How can I make the chipa buns crispier on the outside?
To make the chipa buns crispier on the outside, you can bake them at a 375°F and flatten them slightly before baking.
How can I make the chipa buns softer on the inside?
Make sure to use buttermilk to make the chipa buns softer inside.
Watch How to Make It
Related Recipes:
Recipe
Easy Chipa Buns
Ingredients
- 250 g Tapioca starch
- 250 g self-raising flour
- 2 large eggs , room temperature
- 80 g butter softened to room temperature
- 300 g Mexican 4 cheese , shredded
- 1 tablespoon baking powder
- 1 tablespoon anise seeds
- ¾ cup buttermilk or whole milk, room temperature
Instructions
- Preheat the oven to 375°F. In a large mixing bowl, combine the yuca starch or tapioca starch, salt, self-rising flour, and baking powder. Rub the anise seeds between your palms to release the flavor, then add them to the mixing bowl and stir to combine.
- Place the yuca starch mixture on a clean work surface and make a hole in the center. Add the softened butter and eggs to the hole, then use your fingers to mix the wet ingredients together until somewhat incorporated. Begin to incorporate the yuca starch mixture into the wet mixture a little at a time until a crumbly dough forms. Add the shredded cheese and mix with your hands until everything is well mixed. Drizzle the buttermilk or whole milk a bit at a time, mixing with your hands until a compact and moist but not wet dough has formed.
- Use the heel of your hand to smear the dough away from you until it finishes, then gather it back together with a bench scraper and continue kneading until it becomes smooth and compact and easily detaches from the working surface and your hands. This process should take about 4 to 5 minutes. When done, the dough should have the consistency of smooth playdough. Once you've achieved the perfect consistency, cover the dough with a clean kitchen towel and let it rest for at least 15 to 20 minutes before shaping. This resting time will allow the dough to relax and improve the texture of your final product.
- Cover the dough with a clean kitchen towel and let it rest for at least 15 minutes. Divide the dough into 12 equal portions (about 125g each) and shape each portion into a ball. Place the balls on a greased baking sheet, then gently press down on each ball with three fingers to flatten slightly. Bake the chipa buns in the preheated oven for 30 to 35 minutes or until they are puffed and golden brown. Allow the chipa buns to cool for a few minutes before serving, and enjoy!
Notes
All nutritional information is based on third-party calculations and is only an estimate. Each recipe and nutritional value will vary depending on the brands you use, measuring methods, and portion sizes per household.